Basic usage
WYSIWYG stands for What You See Is What You Get. The WYSIWYG editor is used for editing formatted text in Drupal. Formatted text can contain links, subheadings, lists, and can be bolded and italicized.
Not all fields allow formatted text. When you can use the WYSIWYG you will see an interface like this:

At the top of the WYSIWYG editor is a row of buttons to control formatting and other special functions.
If you hover your cursor over a button for a few seconds, you will get a tooltip about what it does:
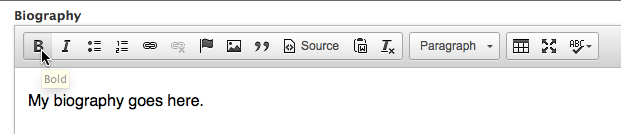
The buttons are, left to right:
- Bold
- Italic
- Bulleted list
- Numbered list
- Link
- Unlink
- Anchor (for linking within a page)
- Image
- Block quote
- Source (advanced use only)
- Paste from Word
- Remove formatting
- Block styles menu
- Table
- Maximise editor
- Check spelling
How to use block styles
To select a block style, it is only necessary to have your cursor somewhere in the paragraph you wish to style. Choose from the selection in the dropdown menu in the WYSIWYG tool bar.
The style for body text is called Paragraph. The drop-down menu says “Paragraph” to indicate that this is the default style.
H1 style is reserved for the page title only and is not an option in the paragraph styles dropdown.
H2 is used to create the section heads within a page (for example: “How to use block styles”) and automatically generates an item in the left sidebar, which serves as an link to that section of the page.
This is an example of a Subhead A (or H3)
TIP: Use sentence case, not title case, for all subheads (That is: capitalize the first word and proper names only.)
This is an example of a Subhead B (H4)
This is an example of a Subhead C (H5)
One more style not on the list:
In addition to all of the block styles that are included in the drop down menu is one that is a default of the wysiwyg tool bar: the Block quote.
Which block style to use
In general the application of Subheads A through C (H3-H5) is obvious. A few notes, however:
- Do not be tempted to use bolded body text as a way to generate a header. There is not enough difference between and a Subhead A and bolded text to be significant, and this will confuse the hierarchy of the page.
- Use italics for emphasis. Any bolded text that falls below an H4 or an H5 will look stronger than the subhead it follows. There are exceptions: for example, a deadline on a page with application information, but it should be used sparingly.
Links (internal, external, & email)
To add a link, select the text that will be linked and click the Link button.
There are several kinds of links:
- Internal (links within this site)
- External (links outside of this site)
- E-mail (opens a message addressed to an e-mail)
Internal links
By default, the WYSIWYG is set to add internal links, meaning links within the MS&I website. This allows for quickly linking to content without needed to find the URL. With the “Link Type” set to “Internal Path” (this is the default), start typing in the “Link” field the name of the page you would like to link.
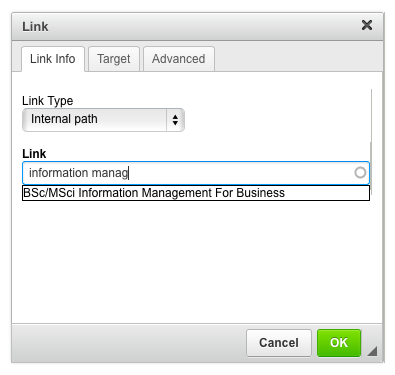
Above, I’ve started typing the name of a page: “information manag.” If I stop typing, a list of matched pages will appear below the text field. You can see “BSc/MSci Information Management For Business” was found. To set the link to this page, I click the result. Now the Link field is filled out with the page title, along with a “node” identifier.
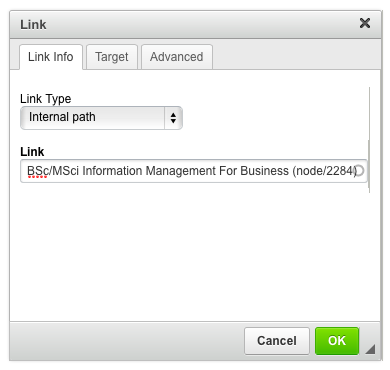
Clicking “OK” sets the link.
External links
To set an external link — a link outside of the MS&I website — choose “URL” from the Link Type menu. You can now type or paste a URL into the “URL” field. The “Protocol” menu will be set automatically if you paste in a full URL. For instance, if you paste “http://www.cs.ucl.ac.uk/” into the “URL” field, you should then see:
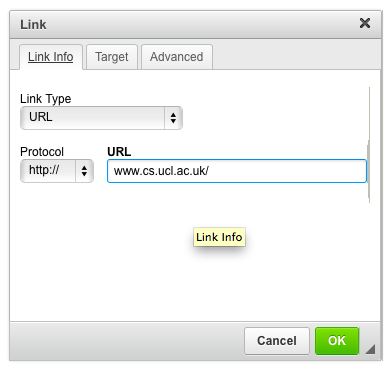
Clicking “OK” sets the link.
TIP: When adding a link, use linked text instead of the full URL. Keep the linked text short.
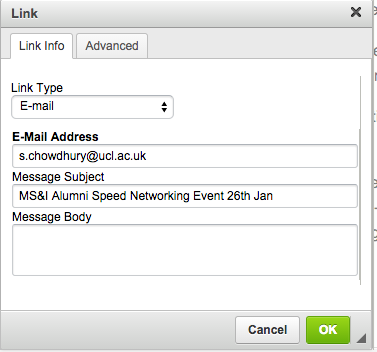
Email links
To add an email link, select name or email in your text, and click the Link button as with other link types. Choose “E-mail” from Link Type menu. Add the email address if not added automatically, and fill out Message Subject and Message Body as needed to help recipient locate all relevant emails.
Anchor links
Anchor links are links to a specific section within the text. To create an anchor link, you first must add an anchor.
- Select the text you would like to link to, and click the Anchor button (the flag).
- Enter a name for the anchor — this name is for you to use later in linking it.
- Click “OK”.
You will now see a flag indicating this text is an anchor. Now add the link.
- Select the text that will link to the anchor text, and click the Link button.
- Choose “Link to anchor in the text” from the Link Type menu.
- Select the name of your anchor in the “By Anchor Name” menu.
- Click “OK”.
Images (and image uploads)
Images appear directly in the WYSIWYG editor.

You can select an image by clicking on it, which will highlight the image. You can delete the image by now pressing the delete key. You can copy, cut and paste the image normally, as you would text.
Image properties
To edit image properties, select the image, and click the image button in the toolbar (the image frame of mountains and a moon).
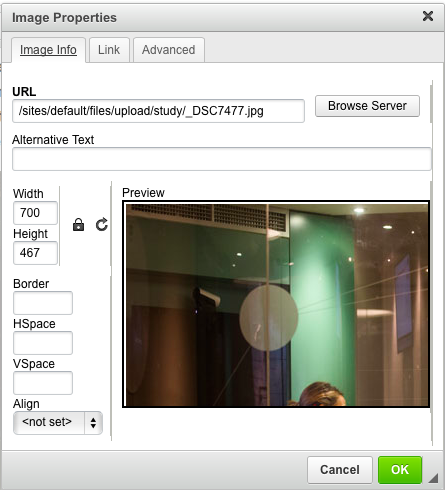
Most settings you will not need to adjust. Here are some important properties:
Under the “Image info” tab, alternative text corresponds to the important “alt” attribute of the HTML image tag. It is descriptive text that is used in place of the image when the image cannot be shown — for instance, when screen reader software is used. All images should include alternative text when possible. Read more about the alt attribute here (wikipedia).
Under the “Link” tab, you may set a link for the image (i.e., the user may click on the image to follow this link). Read more about setting links in the Links section.
Uploading a new image
Have a properly sized .jpg or .png file ready for upload. If you are determining the file format, in most cases jpg should be used; png may be used for graphics and logos. The width should be constrained to 700 pixels — this is the width of the main text column in study pages, events, news, and elsewhere.
To upload the image and place it within the WYSIWYG editor, put the cursor in an empty paragraph where the image should go. Click the image button. An empty “Image Properties” window will appear.
To insert an image, the “URL” property must be set. Even though the image may not yet be uploaded to the server, click the “Browse server” button. This will open a file browser interface to the server.
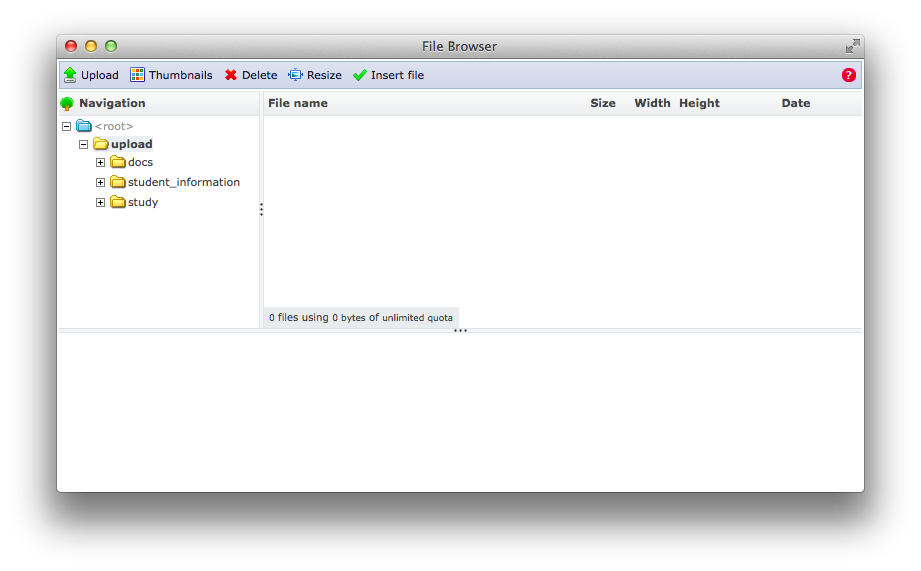
On the left are directories within the server, and on the right are files within the current directory. All files and directories in the “Browse server” interface are underneath the “upload” directory. “upload” may have no files within it (shown above) but it does have directories underneath it: “docs”, “student_information”, “study”. Clicking on the “study” directory will reveal more directories underneath it, one for each study programme.
Select the appropriate directory to upload a file to by clicking on it. Then click “Upload” in the upper left. Choose the image file to upload. Click “Upload”. The new file should appear on the right. Now click “Insert File” near the top of the file browser window.
The file browsing window should close and return you to the “Image Properties” window, with the appropriate URL filled in for the image file. Click “OK” to insert the image.
Uploading a large (hi-res) image
The site will constrain images appearing on the site to 700 pixels, but it is possible to link directly to a higher resolution image file if necessary. See for instance this news item; the image included in the story is linked directly to a higher resolution file.
Upload and insert the image file as normal (see above) in a large resolution. Note: Drupal will resize all images that exceed 1200 pixels in width or height.
If Drupal is unable to complete the upload, the image file may be too large; try constraining the width or height to 1200 pixels first.
When the image is inserted in the WYSIWYG, select the image, and click the Link button. Choose “URL” from the “Link Type” dropdown, and then click “Browse server”. Browse to the image file you uploaded and select it. Click “Insert file”. Then click “OK”.
The image should now be a link to a high resolution file. You may want to add the text “(Click for full image.)” as a caption.
File uploads
File uploads are similar to image uploads (see above) but they are added with the Link button.
A file must be linked to from the text. Select the text to make a link (e.g., “Course information [PDF]”) and click the Link button.
Select “URL” as the link type. Click “Browse server.”
Refer to the image upload section on how to upload a file. Uploading a PDF or .doc file is the same process as uploading an image. When you are done, the URL property of the link should be filled in automatically, and clicking “OK” should create the link.
Tables
Tables should not be used unless absolutely necessary. They are allowed specifically for programme pages (see this page for instance).
You may create a table with the table button in the WYSIWYG toolbar (far right). A “Table Properties” window will appear. Please follow these steps for proper table layout and style:
- Set the number of rows (rows may be added or deleted later)
- Set the number of columns
- Set “Border size” to 0
- Set “Cell spacing” and “Cell padding” to 0
- Set “Width” to 700
- If you are using the first row as headers, set “Headers” to “First Row”
Click “OK”. A new table will be created. Important: there is one last step for a table with two rows. Click into the upper left-most cell in the table. Control-click into this cell, choose “Cell > Cell Properties” from the pop-up menu. Set the “Width” for this cell to 50 percent (type 50 and choose “Percent” instead of “Pixels”). This ensures the two rows are the same width.